目录
这篇文章只是基于OpenCV使用YOLOv3算法执行目标检测;不涉及到YOLOv3的理论原理、不涉及训练过程;也就是说仅仅使用训练好的模型文件基于OpenCV做测试;包括图片和视频;
只用作笔记,原教程地址:
Object Detection with Image
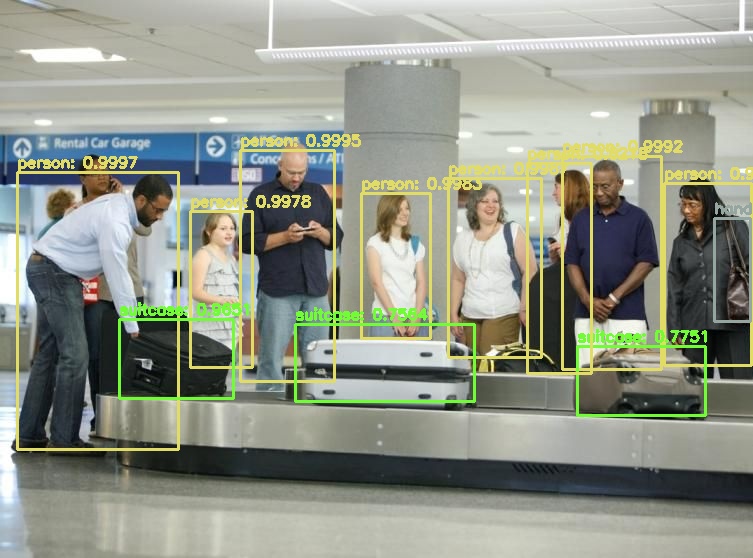
# 执行方式# 里面涉及到的文件,可以到原博客地址下载,或者contact mepython yolo_cz.py --image images/baggage_claim.jpg --yolo yolo-coco
#!/usr/bin/env python#-*- coding:utf-8 -*-# @Time : 19-4-23 下午4:36# @Author : chen# 一些依赖包import numpy as npimport argparseimport timeimport cv2import os# 命令行参数解析ap = argparse.ArgumentParser()ap.add_argument("-i", "--image", required=True, help="path to input image")ap.add_argument("-y", "--yolo", required=True, help="base path to YOLO directory")ap.add_argument("-c", "--confidence", type=float, default=0.5, help="minimum probability to filter weak detections")ap.add_argument("-t", "--threshold", type=float, default=0.3, help="threshold when applying non-maxima suppression")args = vars(ap.parse_args())# 加载COCO标签,因为使用YOLOv3的权重文件是在COCO数据集上训练得到的labelsPath = os.path.sep.join([args["yolo"], "coco.names"])LABELS = open(labelsPath).read().strip().split("\n")# 初始化一个80*3的数组,数组元素值介于0~255;# 80表示COOC总共有80个类别;# 每一行表示一个颜色值,用不同的颜色框出不同类别的物体np.random.seed(42)COLORS = np.random.randint(0, 255, size=(len(LABELS), 3), dtype=np.uint8)# YOLOv3训练好的权重文件路径以及网络配置文件路径weightsPath = os.path.sep.join([args["yolo"], "yolov3.weights"])configPath = os.path.sep.join([args["yolo"], "yolov3.cfg"])# 加载网络# 因为权重文件是由Darknet训练得到,使用cv2.dnn.readNetFromDarknet()加载# opencv中也提供了其他网络模型的加载方法,TensorFlow,Caffe...print("[INFO] loading YOLO from disk...")net = cv2.dnn.readNetFromDarknet(configPath, weightsPath)# 读取待检测的图片,并获取其维度信息image = cv2.imread(args["image"])(H, W) = image.shape[:2]# 获取输出层的名称: ['yolo_82', 'yolo_94', 'yolo_106']ln = net.getLayerNames()ln = [ln[i[0] - 1] for i in net.getUnconnectedOutLayers()]"""上面这两句的目的是为了获取输出层的名字什么意思呢?先来看net.getLayerNames()与net.getUnconnectedOutLayers()的用法了:net.getLayerName() 用法如其名:获取每一层的名称,返回一个列表,如:[conv_0, bn_0, relu_0, conv_1,..., permut_106, yolo_106]net.getUnconnectedOutLayers() 也可以猜到部分含义:这里Unconnected就是后面没有连接的层了; 那么它的作用是以列表的形式返回输出层在整个网络中的索引位置;上面两行代码含义也就明显了:得到输出是:['yolo_82', 'yolo_94', 'yolo_106']其实,还有一个函数,简单明了,直接一步就得到想要的输出了,就是:net.getUnconnectedOutLayerNames()"""# 根据输入图像构造blob# 好像opencv读取深度网络模型,网络的输入都要转换成blob的形式blob = cv2.dnn.blobFromImage(image, 1/255.0, (416, 416), swapRB=True, crop=False)# 输入到网络中,并执行前向传播net.setInput(blob)start = time.time()layerOutputs = net.forward(ln)end = time.time()# 输出一次Inference所用时间print("[INFO] YOLO took {:.6f} seconds.".format(end - start))"""layerOutsputs是YOLO算法在图片中检测到的bbx的信息由于YOLO v3有三个输出,也就是上面提到的['yolo_82', 'yolo_94', 'yolo_106']因此layerOutsputs是一个长度为3的列表其中,列表中每一个元素的维度是(num_detection, 85)num_detections表示该层输出检测到bbx的个数85:因为该模型在COCO数据集上训练,[5:]表示类别概率;[0:4]表示bbx的位置信息;[5]表示置信度下面要做的就是对网络输出的bbx进行检查:判定每一个bbx的置信度是否足够的高,以及执行NMS算法去除冗余的bbx"""# 初始化列表,用以保存bbx的位置信息、类别有关的最大概率值以及对应的索引位置boxes = []confidences = []classIDs = []# 对每个输出层的输出进行迭代for output in layerOutputs: # 对每一个bbx进行检测 for detection in output: scores = detection[5:] # 各类别的概率 classID = np.argmax(scores) # 最大概率位置索引 confidence = scores[classID] # 最大概率 # 判断是否满足人为设定的阈值 if confidence > args["confidence"]: # 如果满足,获取bbx的坐标信息 box = detection[0:4] * np.array([W, H, W, H]) (centerX, centerY, width, height) = box.astype("int") # 计算bbx的坐标信息,bbx左上角点的坐标 x = int(centerX - (width/2)) y = int(centerY - (height/2)) # 更新上面设置的几个列表 boxes.append([x, y, int(width), int(height)]) # 原博客中这样写,其实width、height已经是int confidences.append(float(confidence)) classIDs.append(classID)# 上面已经对三个输出层检测到bbx检测完了# 可以看出,人为设定一个阈值,如果检测到类别概率最大值小于该阈值,则该bbx无效# 经过上一步保留下来的bbx的confidence都是大于人为设定的阈值# 但是会出现冗余的bbx,即检测到的bbx可以都是一个object# 所以会使用NMS算法去除重复的检测框# 有关NMS算法部分,请自行googleidxs = cv2.dnn.NMSBoxes(boxes, confidences, args["confidence"], args["threshold"])"""那么idxs返回的是什么呢?idxs返回的是一个一维数组,其中数组的元素表示保留下来的bbx的索引位置例如: 执行NMS之前bbx有15个,即boxes是一个长度为15的列表 idxs中的元素就表示经过NMS算法后,保留下来的bbx在boxes列表中的索引位置"""# 因此,下面就提取出最后bbx的位置信息,# 并利用OpenCV将其画到图片上if len(idxs) > 0: # 循环每一个bbx for i in idxs.flatten(): # bbx的坐标信息 (x, y) = (boxes[i][0], boxes[i][1]) (w, h) = (boxes[i][2], boxes[i][3]) # 获取当前bbx所对应的颜色值(还记得最一开始的COLORS吗?就是一个类别对应一种颜色) # 颜色值需要根据classID来确定 color = [int(c) for c in COLORS[classIDs[i]]] # 使用OpenCV画矩形 cv2.rectangle(image, (x, y), (x + w, y + h), color, 2) # 需要显示在图片上的文本信息 text = "{}: {:.4f}".format(LABELS[classIDs[i]], confidences[i]) cv2.putText(image, text, (x, y-5), cv2.FONT_HERSHEY_SIMPLEX, 0.5, color, 2)# 显示图片cv2.imshow("Image", image)cv2.imwrite("output.jpg", image)cv2.waitKey(0) Object Detection with Video
# 执行方式# 里面涉及到的文件,可以到原博客地址下载,或者contact mepython yolo_video_cz.py --input videos/car_chase_01.mp4 --output output/chen.avi --yolo yolo-coco
#!/usr/bin/env python#-*- coding:utf-8 -*-# @Time : 19-4-23 下午7:34# @Author : chen"""基于视频的目标检测的测试和上面基于图像的目标检测原理都是一样的不同的地方在于,需要从视频中提取每一帧进行目标检测并将最终检测的结果形成视频保存代码有许多相似之处,不再具体解释"""# 加载依赖包import numpy as npimport argparseimport imutilsimport timeimport cv2import os# 解析命令行参数ap = argparse.ArgumentParser()ap.add_argument("-i", "--input", required=True, help="path to input video")ap.add_argument("-o", "--output", required=True, help="path to output video")ap.add_argument("-y", "--yolo", required=True, help="base path to YOLO directory")ap.add_argument("-c", "--confidence", type=float, default=0.5, help="minimum probability to filter weak detections")ap.add_argument("-t", "--threshold", type=float, default=0.3, help="threshold when applyong non-maxima suppression")args = vars(ap.parse_args())# 加载COCO数据集标签labelsPath = os.path.sep.join([args["yolo"], "coco.names"])LABELS = open(labelsPath).read().strip().split("\n")# 获取颜色值np.random.seed(42)COLORS = np.random.randint(0, 255, size=(len(LABELS), 3), dtype="uint8")# 加载YOLO目标检测器weightsPath = os.path.sep.join([args["yolo"], "yolov3.weights"])configPath = os.path.sep.join([args["yolo"], "yolov3.cfg"])print("[INFO] loading YOLO from disk...")net = cv2.dnn.readNetFromDarknet(configPath, weightsPath)ln = net.getLayerNames()ln = [ln[i[0] - 1] for i in net.getUnconnectedOutLayers()]# 初始化VideoCapture类vc = cv2.VideoCapture(args["input"])writer = None(W, H) = (None, None)# 获取视频的总的帧数try: prop = cv2.cv.CV_CAP_PROP_FRAME_COUNT if imutils.is_cv2() \ else cv2.CAP_PROP_FRAME_COUNT total = int(vc.get(prop)) print("[INFO] {} total frames in video".format(total))# an error occurred while trying to determine the total# number of frames in the video fileexcept: print("[INFO] could not determine # of frames in video") print("[INFO] no approx. completion time can be provided") total = -1# 循环检测视频中的每一帧while True: # 读取帧 # grabbed是一个bool,表示是否成功捕获帧 # frame是捕获的帧 (grabbed, frame) = vc.read() # 退出循环 if not grabbed: break # 如果W,H为空,获取第一帧的width、height if W is None or H is None: (H, W) = frame.shape[:2] # 构造blob,并输入到网络中,执行Inference blob = cv2.dnn.blobFromImage(frame, 1 / 255.0, (416, 416), swapRB=True, crop=False) net.setInput(blob) start = time.time() layerOutputs = net.forward(ln) end = time.time() # 初始化列表,保存bbx信息 boxes = [] confidences = [] classIDs = [] # 循环每一个输出层的输出 for output in layerOutputs: # 循环该层输出的每一个bbx for detection in output: # 获取当前bbx的信息 scores = detection[5:] classID = np.argmax(scores) confidence = scores[classID] # 类别最大概率与设定的阈值相比较 if confidence > args["confidence"]: # bbx的坐标信息 box = detection[0:4] * np.array([W, H, W, H]) (centerX, centerY, width, height) = box.astype("int") x = int(centerX - (width / 2)) y = int(centerY - (height / 2)) # 更新bbx列表 boxes.append([x, y, int(width), int(height)]) confidences.append(float(confidence)) classIDs.append(classID) # 执行NMS算法,去除重复的bbx idxs = cv2.dnn.NMSBoxes(boxes, confidences, args["confidence"], args["threshold"]) if len(idxs) > 0: # 循环提取每一个bbx坐标信息,使用OpenCV画在图上 for i in idxs.flatten(): # bbx坐标信息 (x, y) = (boxes[i][0], boxes[i][1]) (w, h) = (boxes[i][2], boxes[i][3]) # 画出bbx color = [int(c) for c in COLORS[classIDs[i]]] cv2.rectangle(frame, (x, y), (x + w, y + h), color, 2) text = "{}: {:.4f}".format(LABELS[classIDs[i]], confidences[i]) cv2.putText(frame, text, (x, y - 5), cv2.FONT_HERSHEY_SIMPLEX, 0.5, color, 2) # 检查writer是否为空 if writer is None: # 初始化VideoWriteer fourcc = cv2.VideoWriter_fourcc(*"MJPG") writer = cv2.VideoWriter(args["output"], fourcc, 30, (frame.shape[1], frame.shape[0]), True) # 输出处理每一帧的时间,以及处理完视频总的时间 if total > 0: elap = (end - start) print("[INFO] single frame took {:.4f} seconds".format(elap)) print("[INFO] estimated total time to finish: {:.4f}".format(elap * total)) # 写入当前帧 writer.write(frame)# 释放文件指针print("[INFO] cleaning up...")writer.release()vc.release()